POV Display Using SPRESENSE
本記事にはアフィリエイト広告が含まれます。
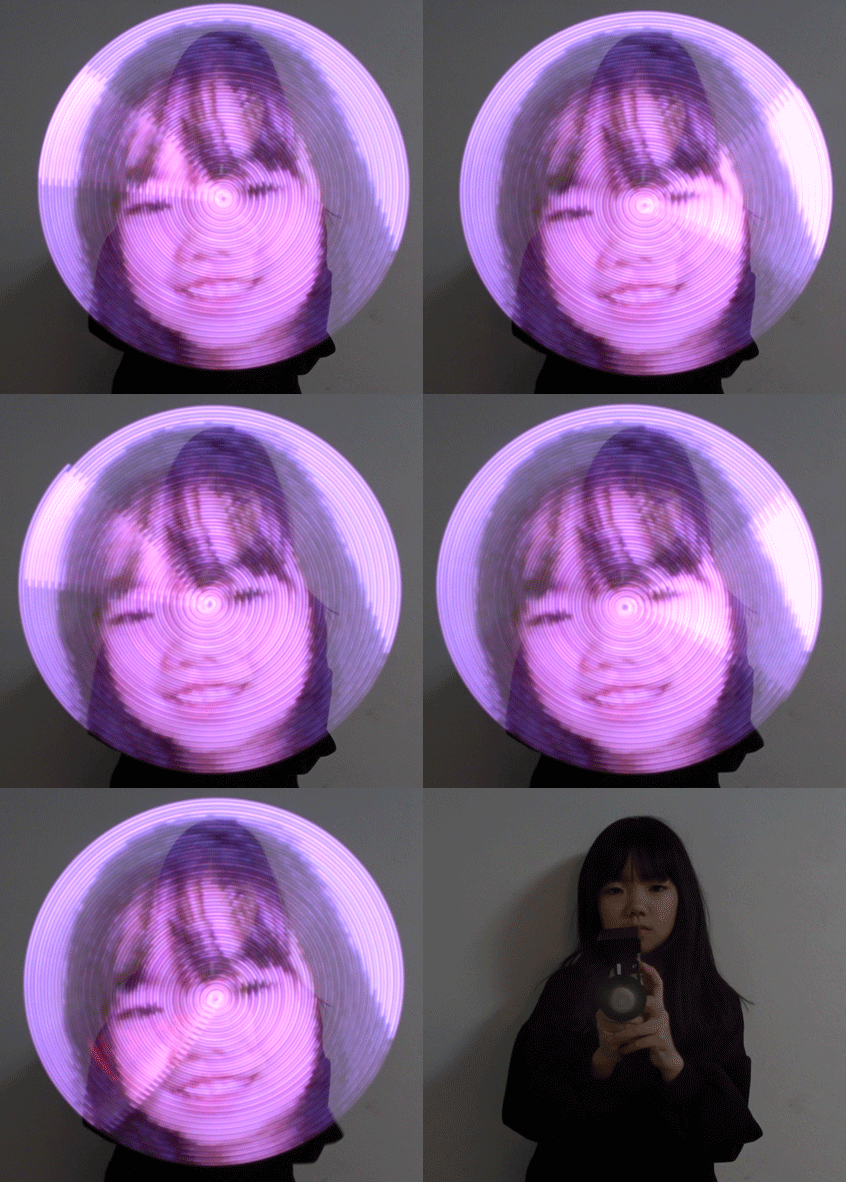
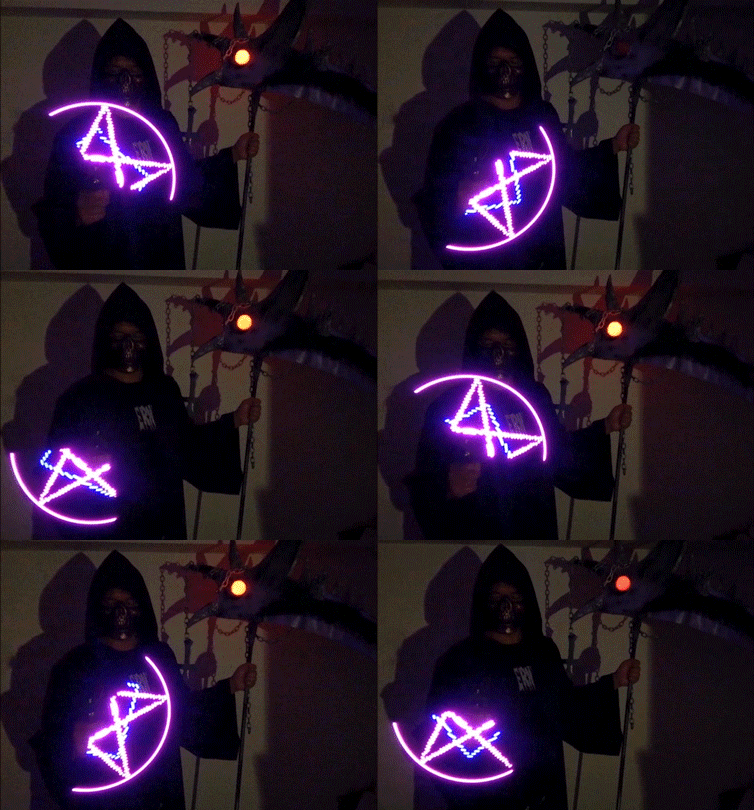
I made a full color POV display using SPRESENSE and DotStar LED tape.
目次
Constitution
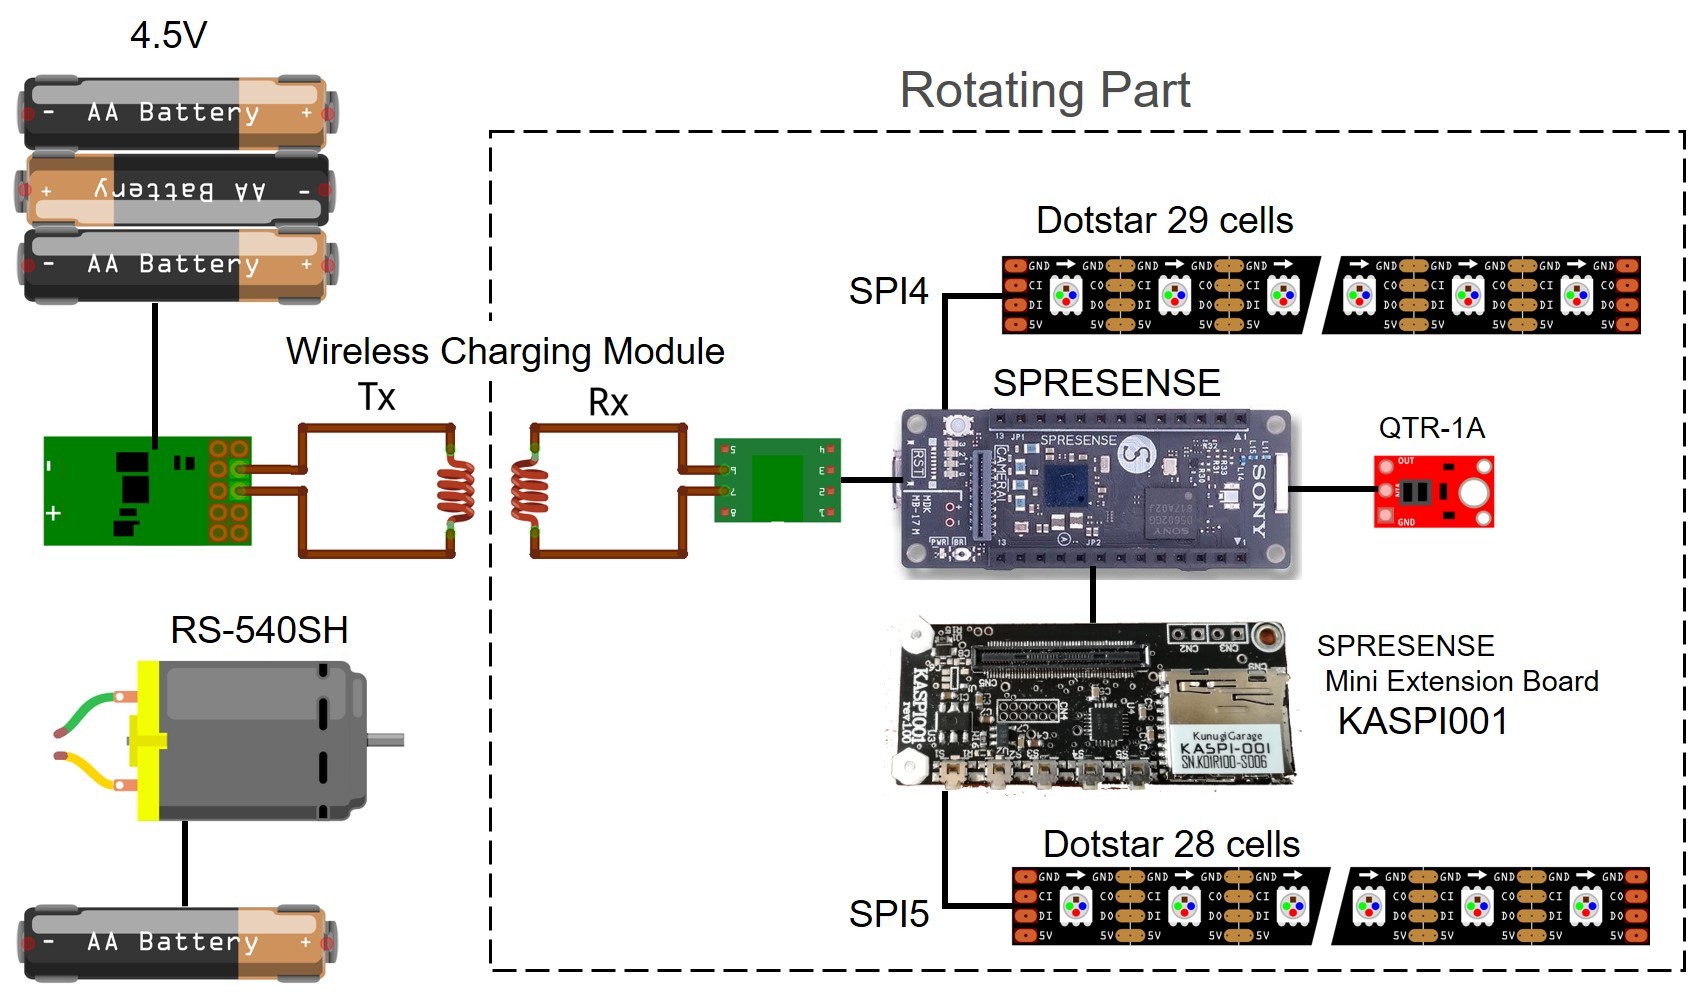
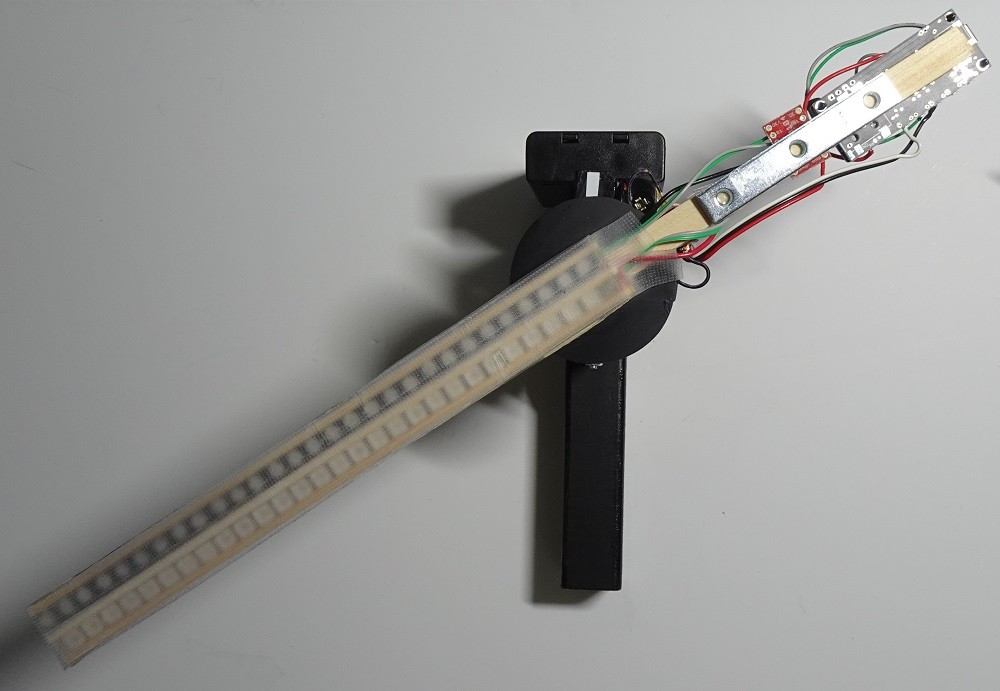
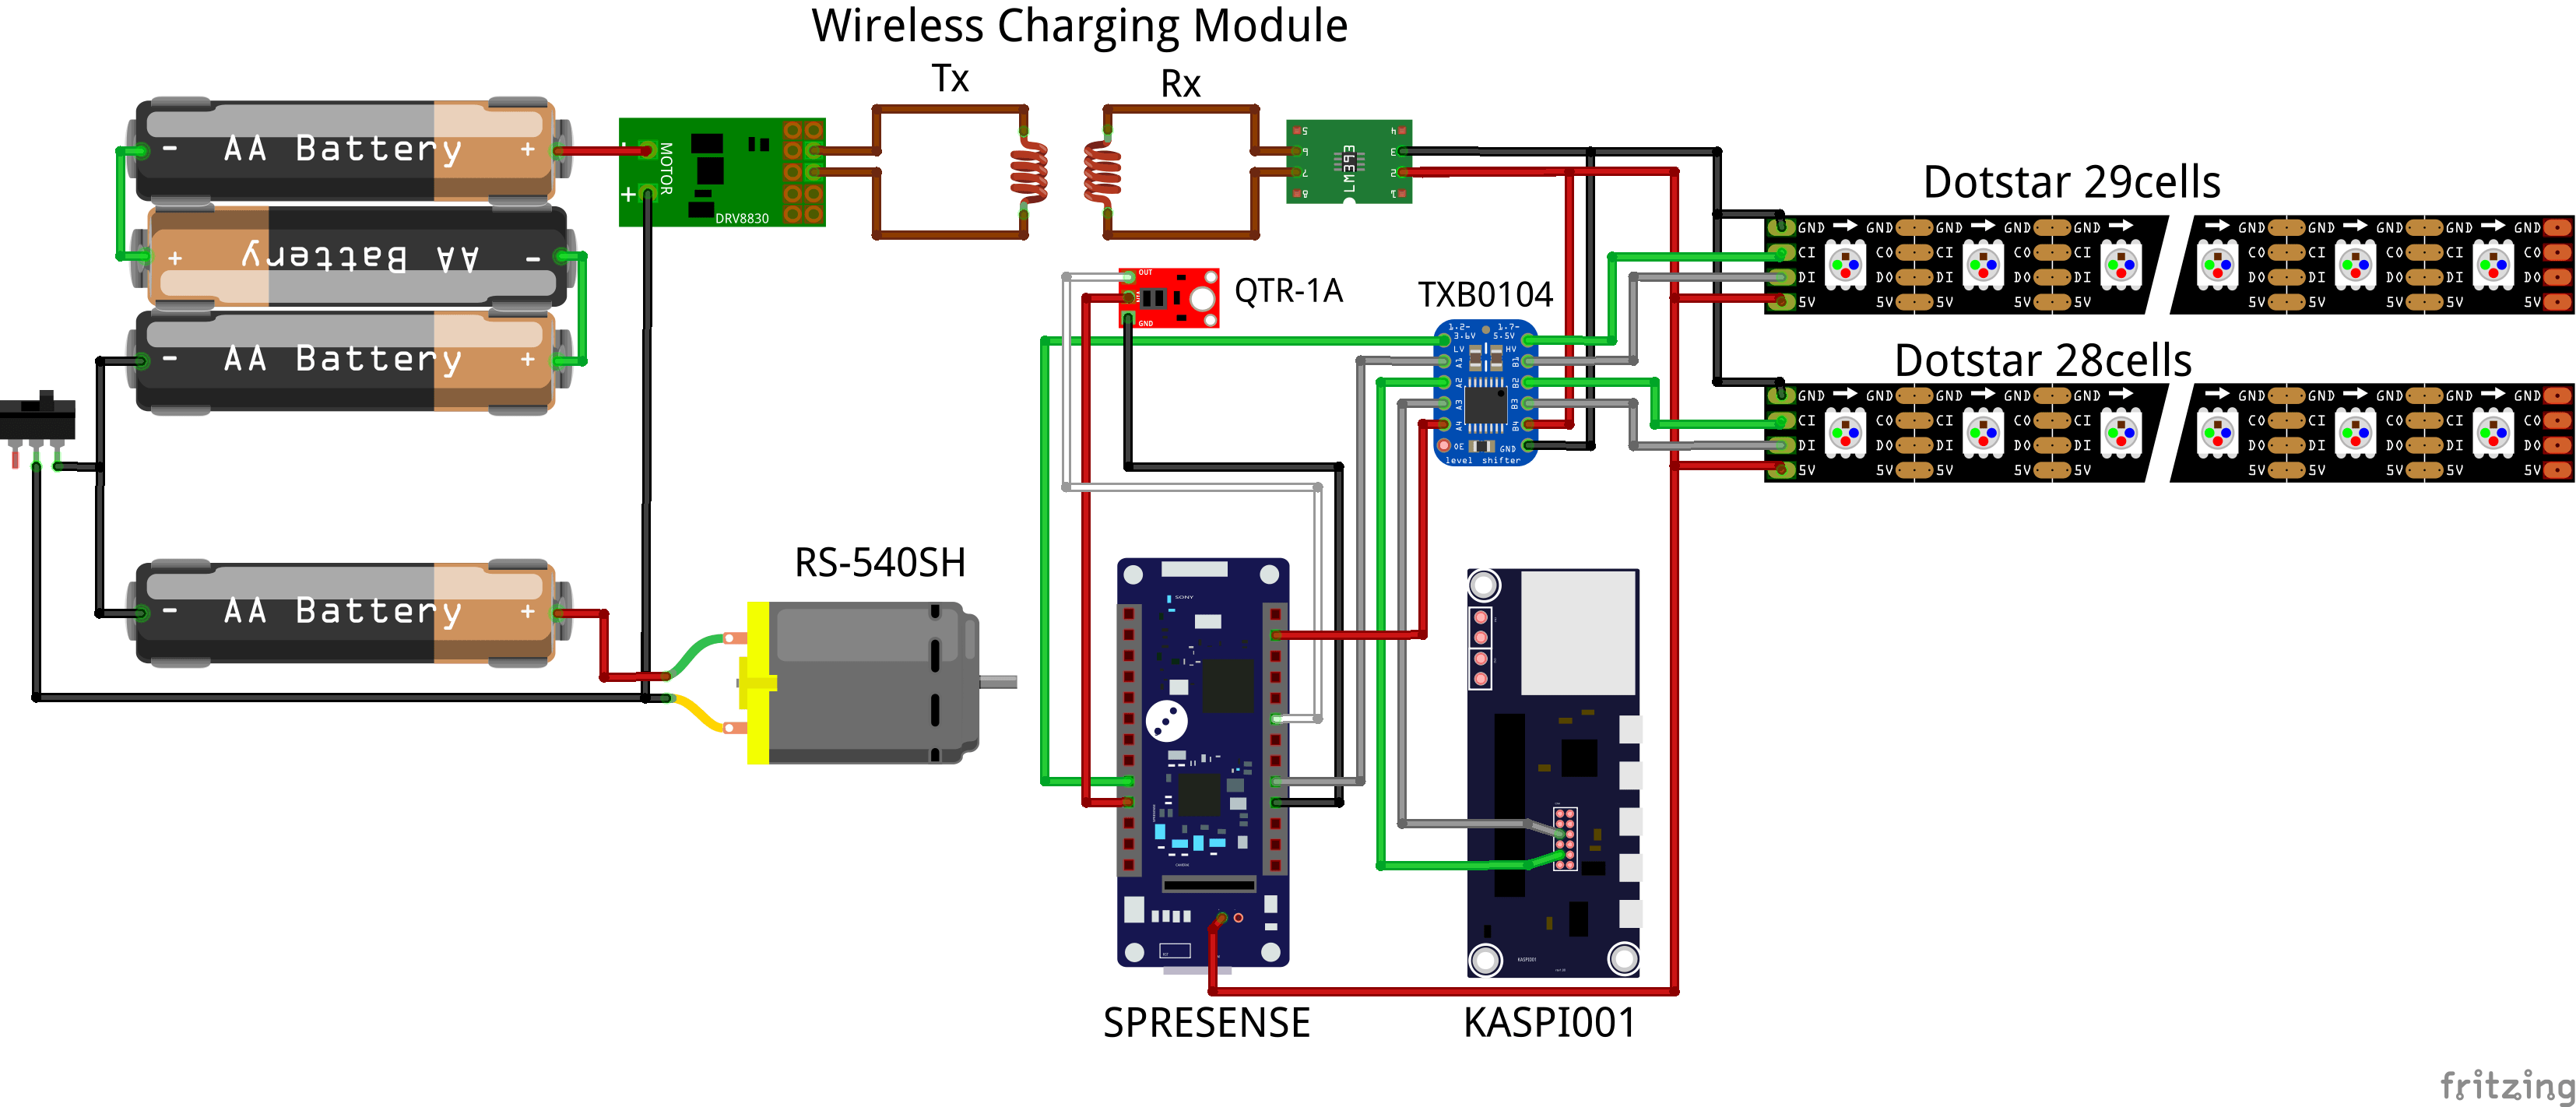
LED tape, SPRESENSE and reflectance sensor are mounted on the rotating part, and LED tape uses DotStar. Using the wireless charging module, the power supply to the rotating part was carried out wirelessly.
One AA battery was used for the motor and three AA batteries for the wireless power supply to the rotating part.
Parts
- Sony SPRESENSE
- SPRESENSE Mini Extension Board KASPI001
- QTR-1A Reflectance Sensor
- Adafruit DotStar Digital LED Strip
- DFRobot Wireless Charging Module 5V/1A
- DC Motor RS-540SH
- SparkFun Voltage-Level Translator TXB0104
POV Display Device
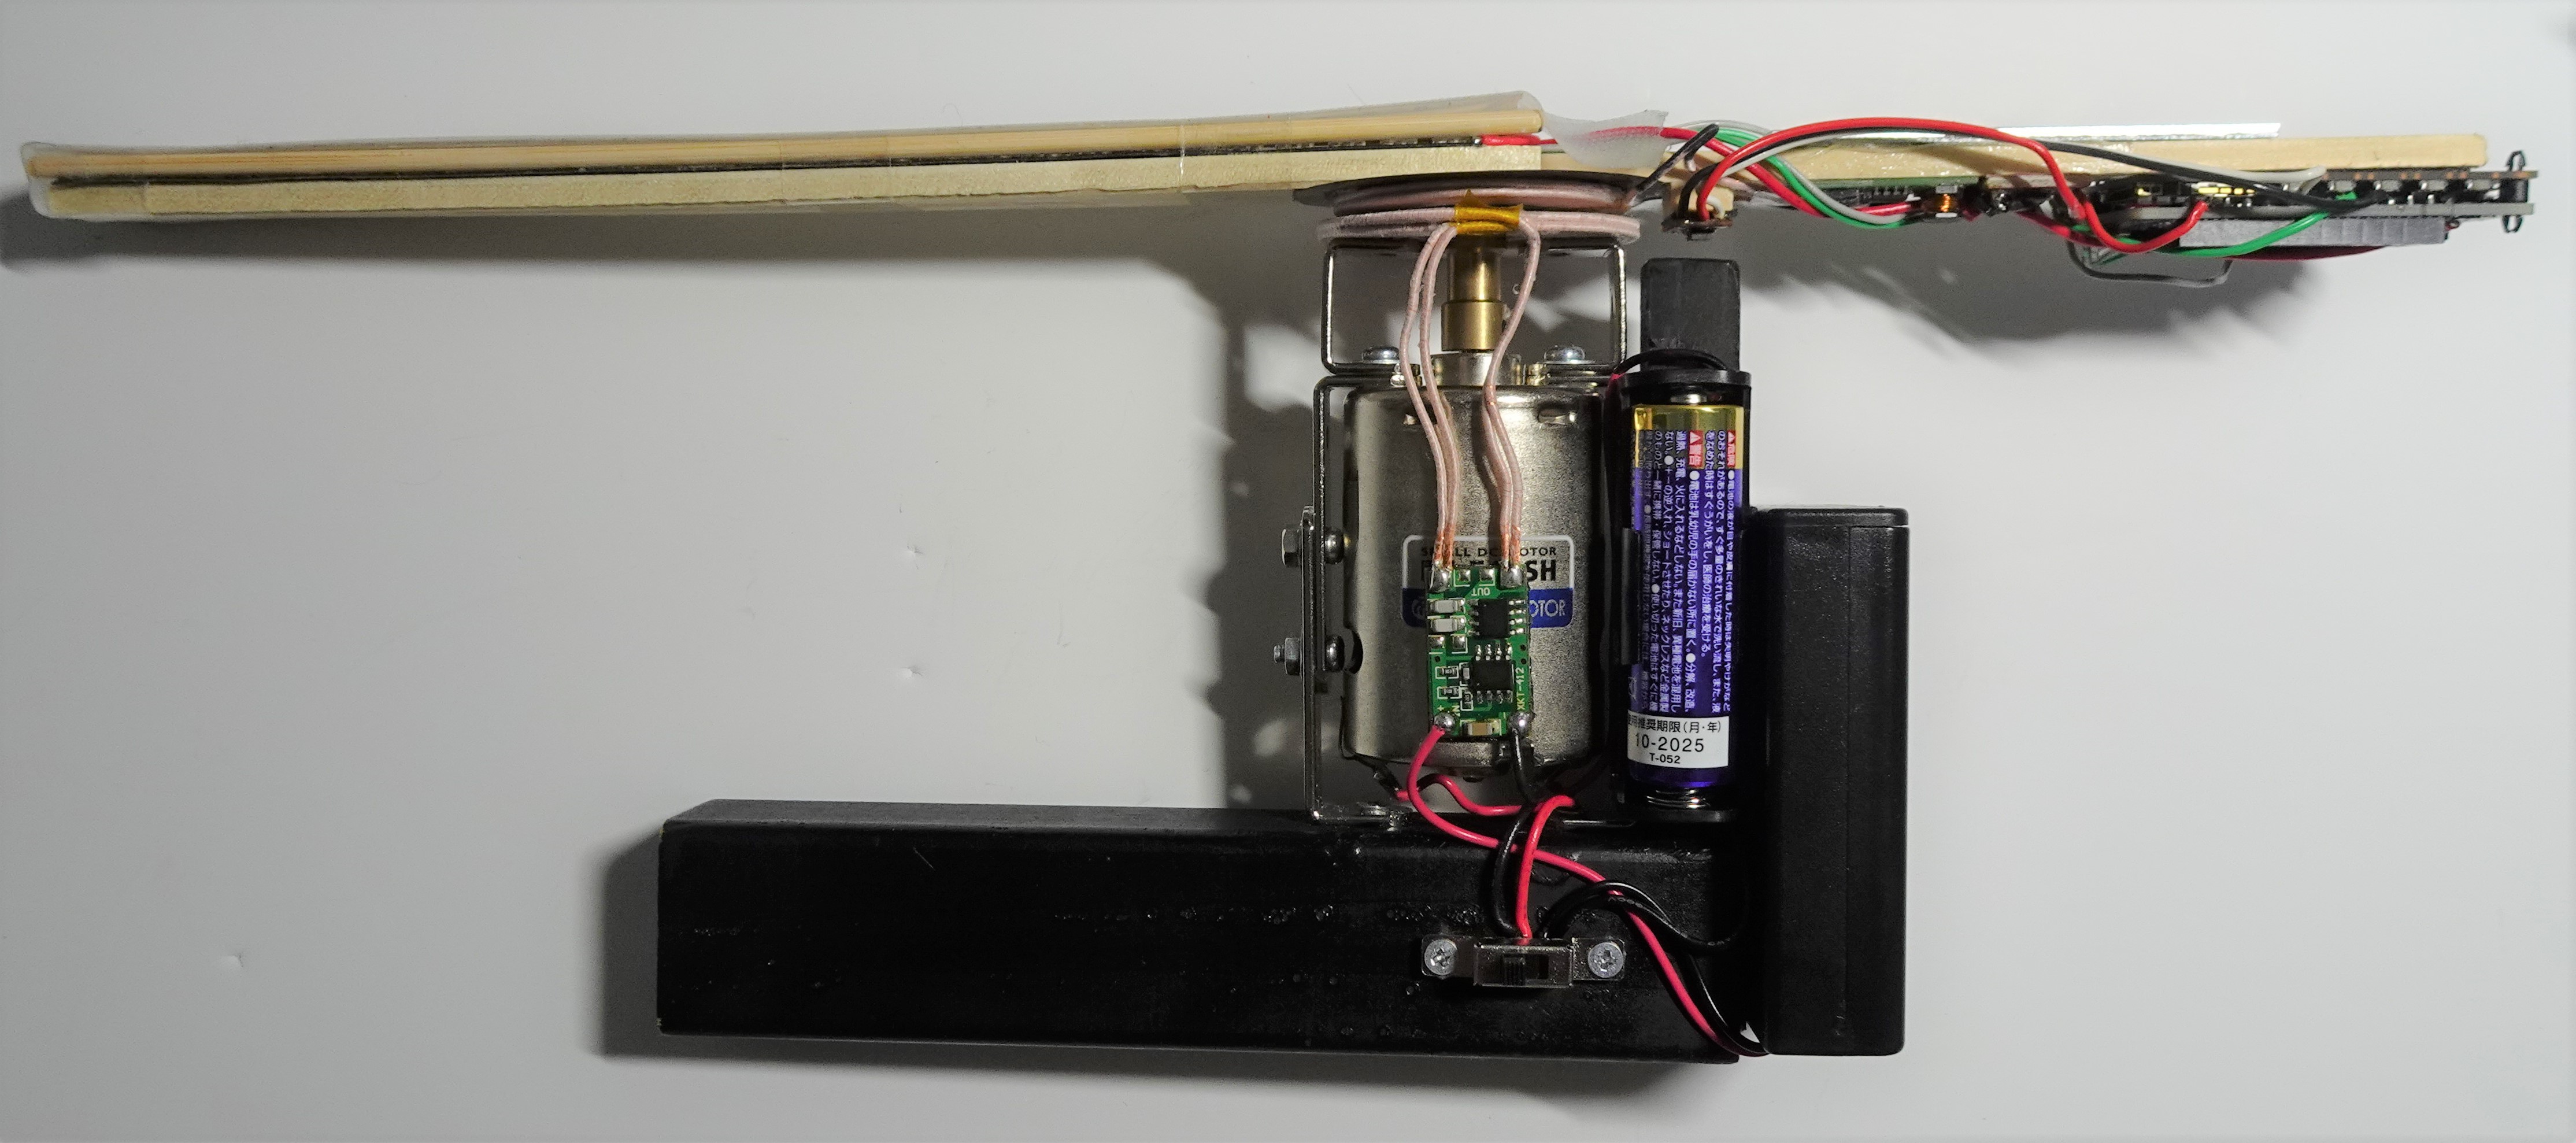
The motor was fixed with metal fittings and the handle was made with black wood, and the battery socket and power supply on/off slide switch were fixed.
The rotating part is completely independent as follows.
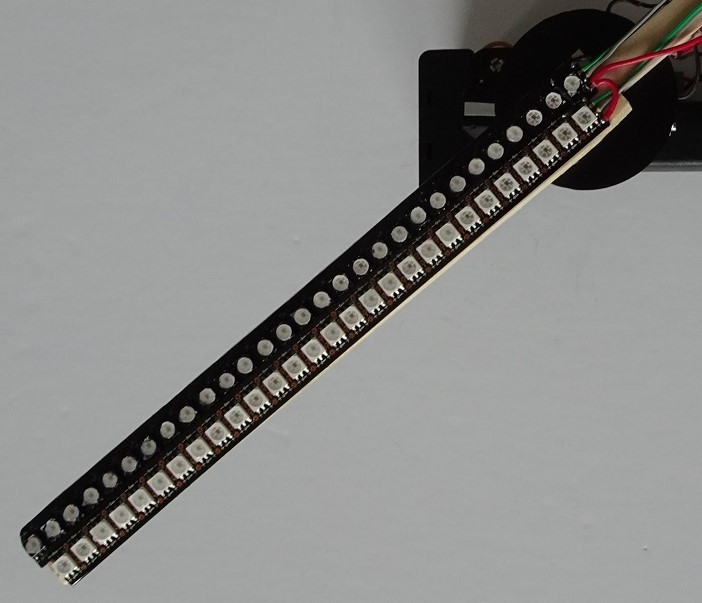
I used two Dotstar LED tapes. 29 cells LED tape is controlled by SPI4. 28 cells LED tape is controlled by SPI5.
I spread a milky film for the diffusion of light.
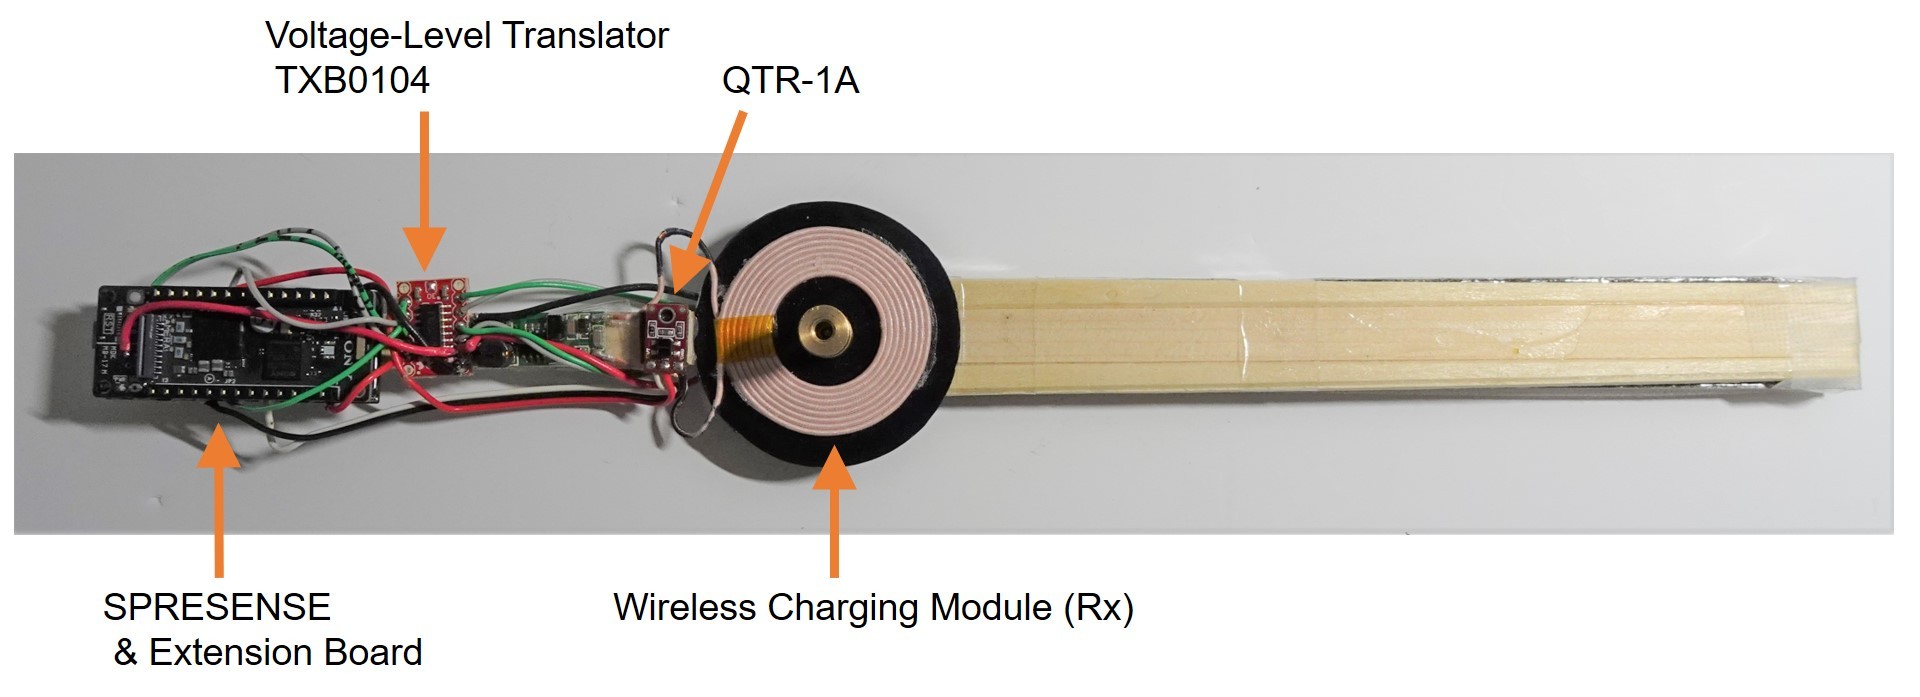
Voltage-Level Translator TXB0104 is used to convert the logic level of SPRESENSE from 1.8V to 5V.
I used the wireless charge module for power supply to the LED rotating part. It is only placed in the face-through the transmission coil to the rotation axis of the motor without almost processing.
Arduino IDE Code
The following libraries are used for Dotstar.
https://github.com/adafruit/Adafruit_DotStar
Adafruit_DotStar_SPI5.h is a modification of Adafruit_DotStar.h to use SPI5.
When a reflectance sensor detects a marker, it decreases the output, so it detects it in the attachinterrupt and measures the time it takes to interrupt processing by one lap.
It switches the LED blink by dividing the time of one lap by 150. LED display patterns are stored as an array in graphics.h.
|
1 2 3 4 5 6 7 8 9 10 11 12 13 14 15 16 17 18 19 20 21 22 23 24 25 26 27 28 29 30 31 32 33 34 35 36 37 38 39 40 41 42 43 44 45 46 47 48 49 50 51 52 53 54 55 56 57 58 59 60 61 62 63 64 65 |
#include <SPI.h> #include "Adafruit_DotStar_SPI5.h" #include <Adafruit_DotStar.h> #include "graphics.h" #define NUMPIXELS2 29 // Number of LEDs in strip #define NUMPIXELS 57 // Number of LEDs in 2 strips #define Frame 16 #define Div 150 #define Fclk 26000000 #define itrPin 19 int numRot = 0; int numDiv = 0, numDiv2 = 0; int stateDiv = 0; unsigned long rotTime, timeOld, timeNow; Adafruit_DotStar_SPI5 strip5 = Adafruit_DotStar_SPI5(NUMPIXELS2, DOTSTAR_BGR); Adafruit_DotStar strip4 = Adafruit_DotStar(NUMPIXELS2, DOTSTAR_BGR); void setup() { Serial.begin(115200); strip5.begin(); SPI5.beginTransaction(SPISettings(Fclk, MSBFIRST, SPI_MODE0)); strip4.begin(); SPI.beginTransaction(SPISettings(Fclk, MSBFIRST, SPI_MODE0)); strip5.clear(); strip4.clear(); strip5.show(); strip4.show(); delay(500); attachInterrupt(digitalPinToInterrupt(itrPin), RotCount, FALLING ); } void loop() { if(stateDiv == 1 && micros() - timeOld > rotTime / Div * (numDiv)){ stateDiv = 0; } if(stateDiv == 0 && micros() - timeOld < rotTime / Div * (numDiv + 1)){ stateDiv = 1; strip5.clear(); strip4.clear(); for(int i=0;i<NUMPIXELS2; i++){ numDiv2 = numDiv+2; if(numDiv2 >= Div) numDiv2 -= Div; strip5.setPixelColor(i, pic[numRot][numDiv2][i*2]); strip4.setPixelColor(i, pic[numRot][numDiv][i*2+1]); } strip5.show(); strip4.show(); numDiv++; if(numDiv >= Div ) numDiv = 0; } } void RotCount() { timeNow = micros(); rotTime = timeNow - timeOld; timeOld = timeNow; numRot++; if(numRot >= Frame) numRot = 0; } |
Display Graphic Data Creation Method (Python)
Create POV display data “graphics.h” in Python Code. Display data can be created from GIF or still images.
|
1 2 3 4 5 6 7 8 9 10 11 12 13 14 15 16 17 18 19 20 21 22 23 24 25 26 27 28 29 30 31 32 33 34 35 36 37 38 39 40 41 42 43 44 45 46 47 48 49 50 51 52 53 54 55 56 57 58 59 60 61 62 63 64 65 66 67 68 69 70 71 72 73 74 75 76 77 78 79 80 81 82 83 84 |
# -*- coding: utf-8 -*- import cv2 import os import math from PIL import Image #Array setting NUMPIXELS = 57 #Number of LEDs Div = 150 #Number of divisions per lap Bright = 30 #LED Brightness Led0Bright = 3 #Brightness of center LED [%] #File creation file = open('graphics.h', 'w') file.write('#define NUMPIXELS ' + str(NUMPIXELS) + '\n') file.write('#define Div ' + str(Div) + '\n' + '\n') #file.write('#define Frame ' + str(Frame) + '\n' + '\n') file.write('const uint32_t pic [Frame][Div][NUMPIXELS] = {' + '\n') # Read GIF file gif_file_name = "xxx.gif" gif = cv2.VideoCapture(gif_file_name) #Image conversion function def polarConv(pic, i): imgOrgin = cv2.imread(pic) #Read image data h, w, _ = imgOrgin.shape #Get image size #Image reduction imgRedu = cv2.resize(imgOrgin,(math.floor((NUMPIXELS * 2 -1)/h *w), NUMPIXELS * 2 -1)) #cv2.imwrite(str(i) + '-resize.jpg',imgRedu) #Reduced image center coordinates h2, w2, _ = imgRedu.shape wC = math.floor(w2 / 2) hC = math.floor(h2 / 2) #Polar coordinate conversion image preparation imgPolar = Image.new('RGB', (NUMPIXELS, Div)) #Polar transformation file.write('\t{\n') for j in range(0, Div): file.write('\t\t{') for i in range(0, hC+1): #Get coordinate color rP = int(imgRedu[hC + math.ceil(i * math.cos(2*math.pi/Div*j)), wC - math.ceil(i * math.sin(2*math.pi/Div*j)), 2] * ((100 - Led0Bright) / NUMPIXELS * i + Led0Bright) / 100 * Bright /100) gP = int(imgRedu[hC + math.ceil(i * math.cos(2*math.pi/Div*j)), wC - math.ceil(i * math.sin(2*math.pi/Div*j)), 1] * ((100 - Led0Bright) / NUMPIXELS * i + Led0Bright) / 100 * Bright /100) bP = int(imgRedu[hC + math.ceil(i * math.cos(2*math.pi/Div*j)), wC - math.ceil(i * math.sin(2*math.pi/Div*j)), 0] * ((100 - Led0Bright) / NUMPIXELS * i + Led0Bright) / 100 * Bright /100) file.write('0x%02X%02X%02X' % (rP,gP,bP)) if i == hC: file.write('},\n') else: file.write(', ') imgPolar.putpixel((i,j), (rP, gP, bP)) file.write('\t},\n\n') #Generate directory to save screen capture dir_name = "screen_caps" if not os.path.exists(dir_name): os.mkdir(dir_name) i = 0 while True: is_success, frame = gif.read() # Exit when the file can not be read if not is_success: break # Write out to an image file img_name = str(i) + ".jpg" img_path = os.path.join(dir_name, img_name) cv2.imwrite(img_path, frame) #conversion polarConv(img_path, i) i += 1 file.write('};' + '\n' + '\n') file.close() #Inserting the number of frames at the beginning of the file with open('graphics.h') as f: l = f.readlines() l.insert(0, '#define Frame ' + str(i) + '\n') with open('graphics.h', mode='w') as f: f.writelines(l) |
Test GIF File
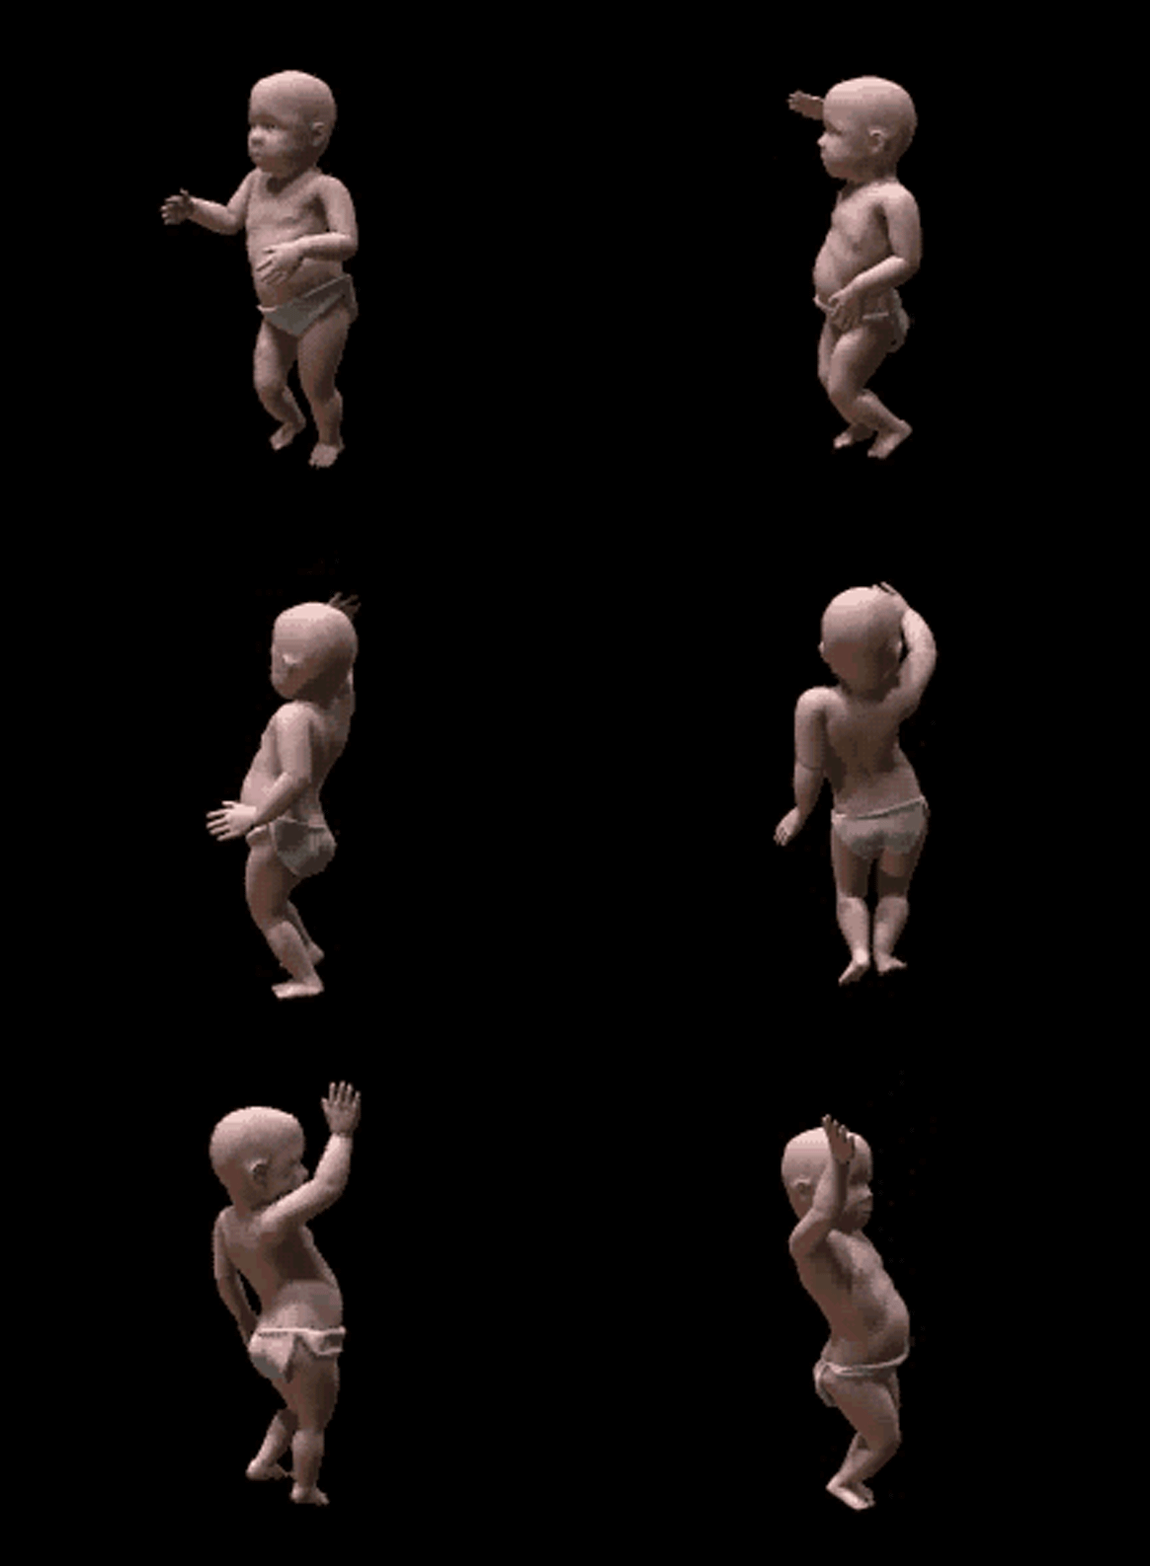
I used the following GIF file. The number of frames is 16.
Operation
ミニ拡張ボードが本日届き SPI4とSPI5でLEDテープ2本制御できた。回転方向の分解能は70/周で外付けのレベルシフタで律速。明日高速レベルシフタが届くので回転方向の高分解能化にも期待したい。あとSDにデータ持って長編表示も試したい。https://t.co/h0IIR7E7cB#SPRESENSE #GIF #POVディスプレイ pic.twitter.com/1MaKvrBBAb
— HomeMadeGarbage (@H0meMadeGarbage) 2019年2月15日
Holographic display could be easily realized using SPRESENSE with two SPI outputs at high speed.
 お父ちゃん
2019.5.6





Hello – great project. I would like to recreate this using my own images but I have a few questions.
– why did you use spresence? Is there a cheaper, but equally as good microcontroller I could use?
– when you say “the Adafruit_DotStar_SPI5.h is a modification of Adafruit_DotStar.h to use SPI5” what change did you make?
I hope you don’t mind me asking – I really want to make this for a group of artists in the US for demonstration and I might have more questions as I am really a beginner.
Thanks, jackie