LR発音矯正ギブス -Google Speech API で音声認識 –
本記事にはアフィリエイト広告が含まれます。
音声認識Google Speech APIを利用して英語発音矯正ギブスを作製しました!
日本人にとってLとRの発音の区別って難しいですよね〜
そこで音声認識技術を用いたこの装置を使用することで発音の向上が期待できます!ww
目次
概要
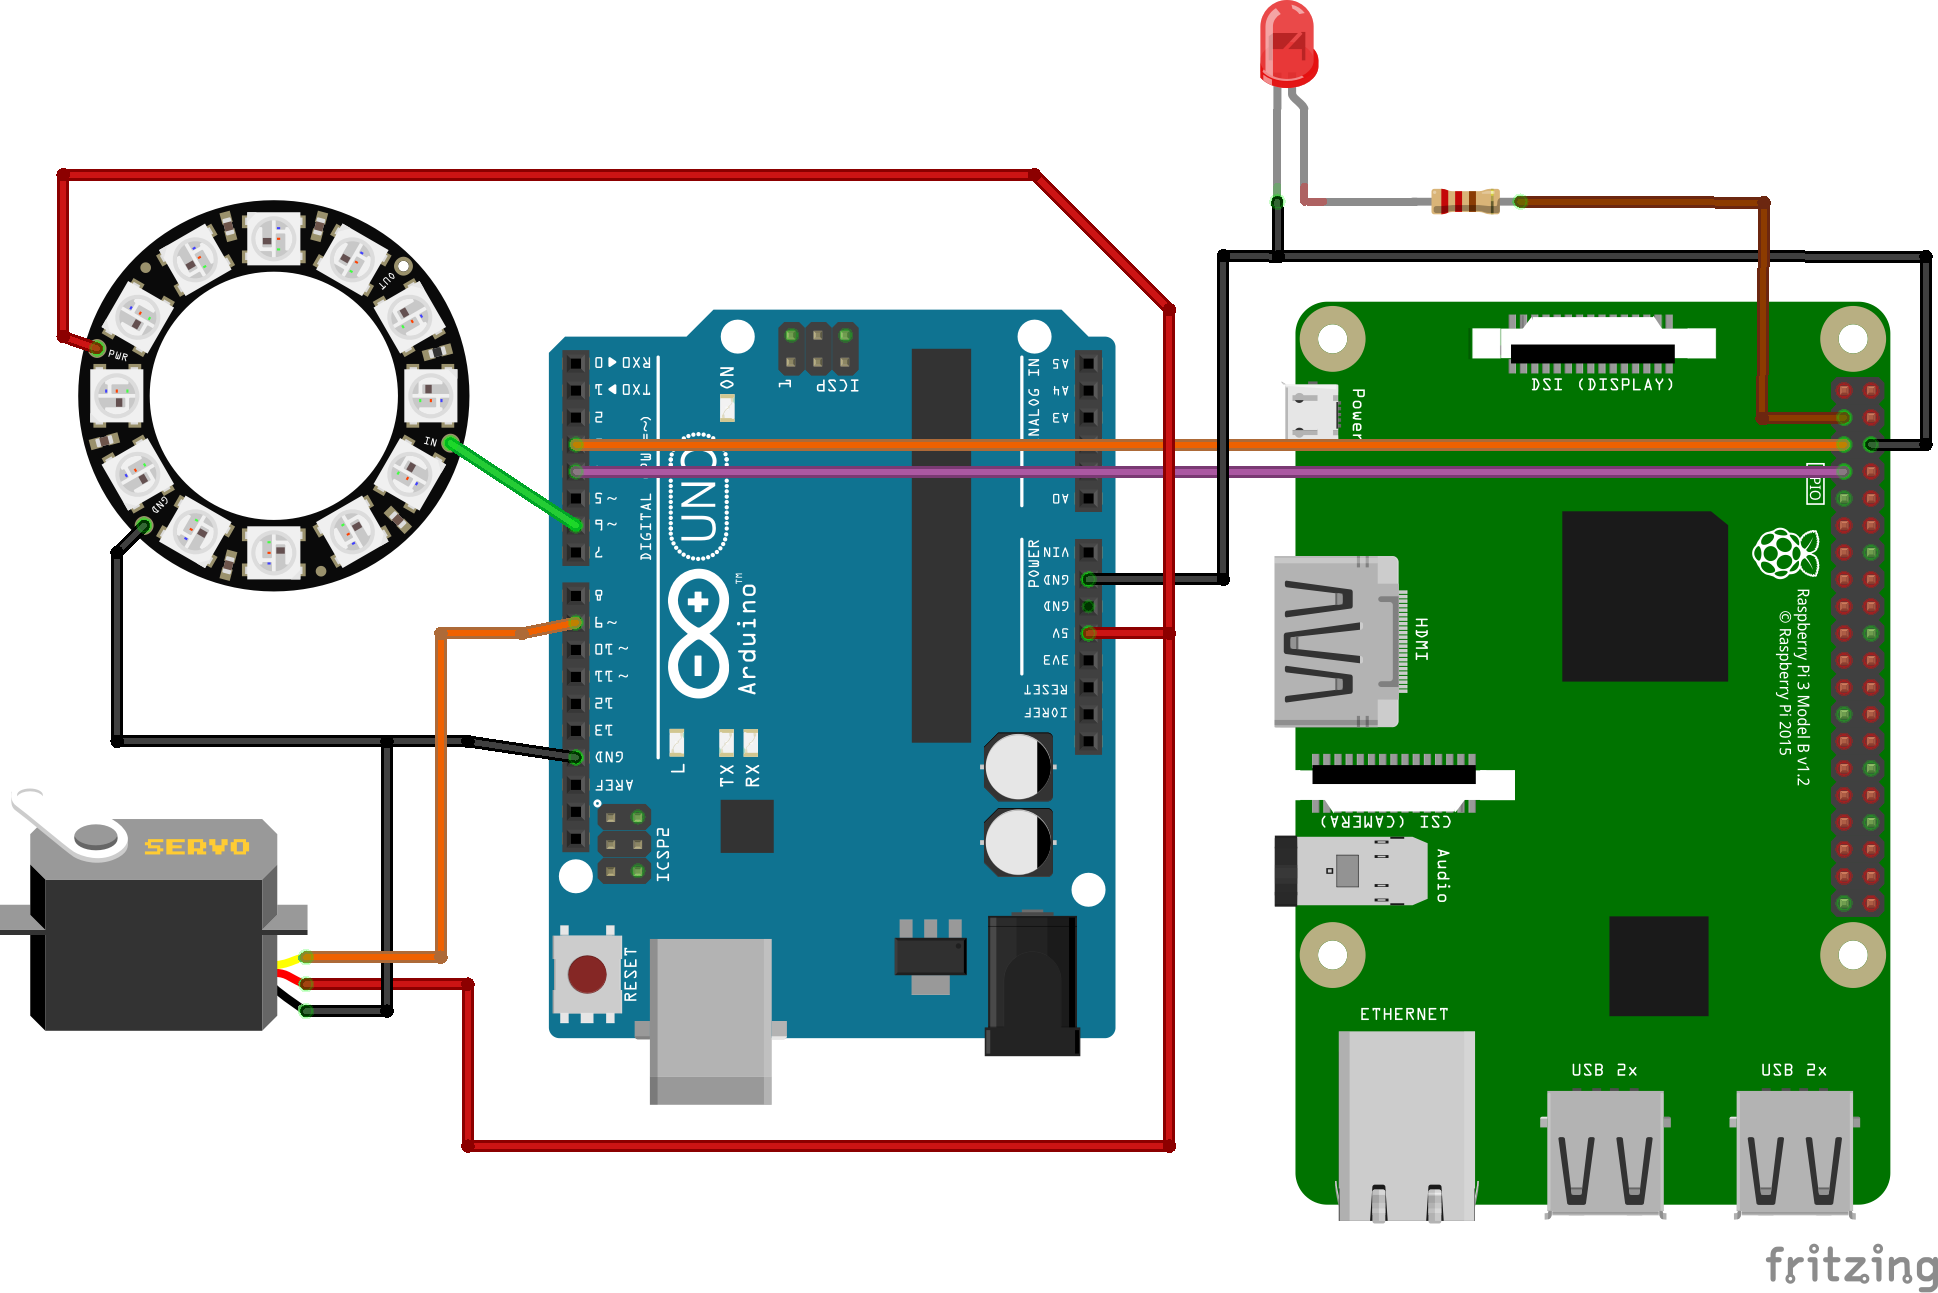
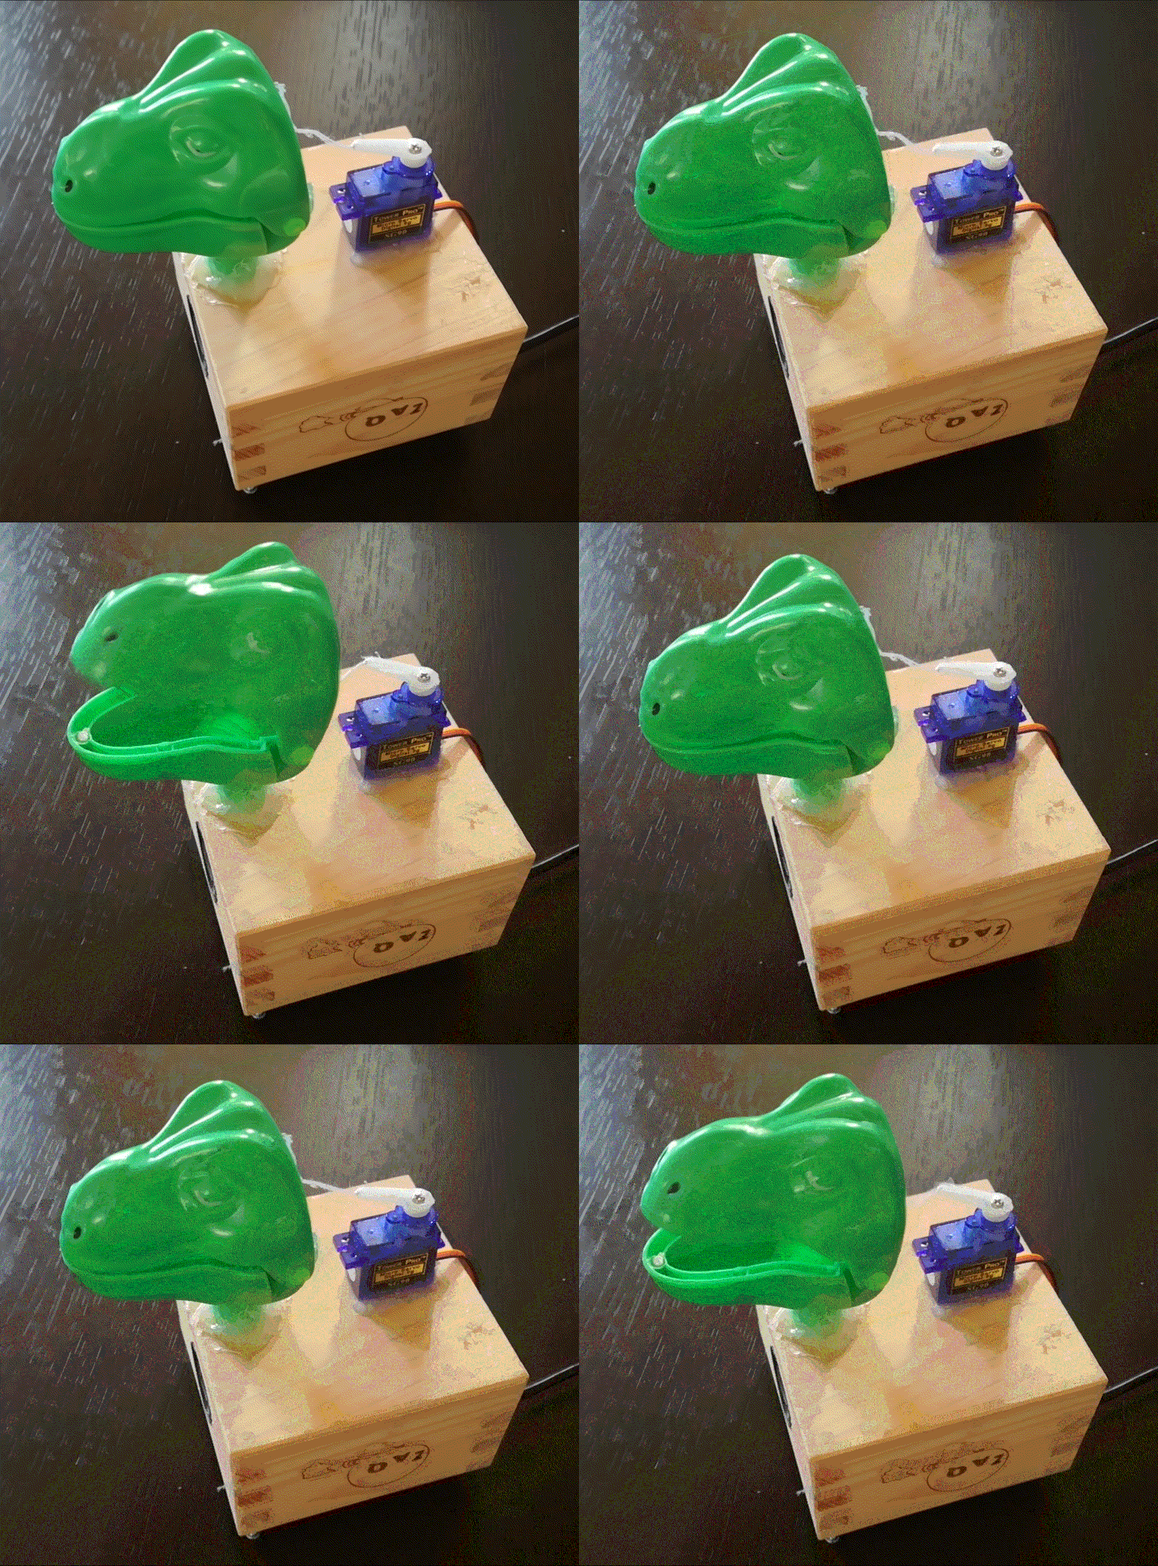
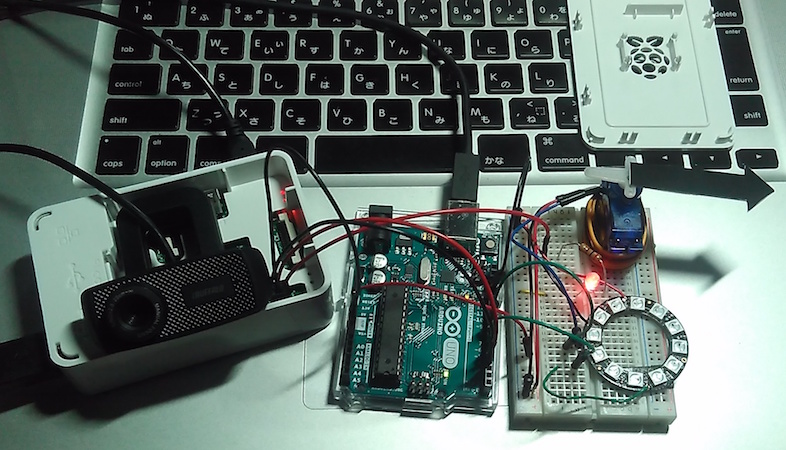
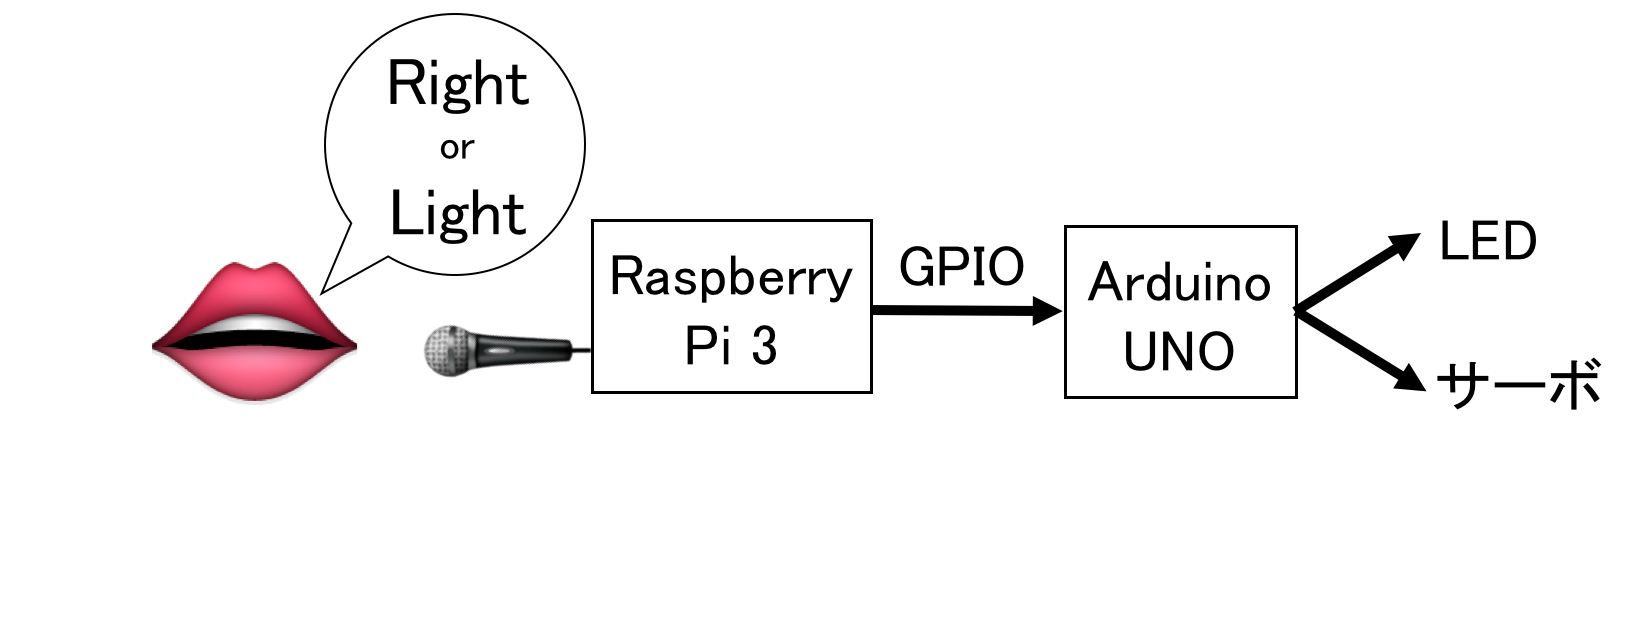
ラズパイに接続したマイクに“right”もしくは”light”と話しかけ正しく認識できると“right”の場合はサーボモータが右を指し、”light”の場合はLEDが点灯します。
部品
-
-
- マイクはwedカメラを使用
- Raspberry Pi 3
- マイコン Arduino UNO
- NeoPixel Ring – 12連フルカラーシリアルLED
- サーボモータ SG90
- マイクはwedカメラを使用
-
音声認識
音声認識については以下の書籍が非常に参考になりました。
ここではGoogle Speech APIを使用してマイクに入力された音声の認識を行っています。APIの登録やキー取得方法は以下のとおりです。
ラズパイ設定
音声処理ライブラリsoxインストール
|
1 |
$ sudo apt-get install alsa-utils sox libsox-fmt-all |
Pythonプログラム
録音時に赤LEDを光らせ、”right”と”light”を認識するとArduinoに信号を送ります(GPIO)。
|
1 2 3 4 5 6 7 8 9 10 11 12 13 14 15 16 17 18 19 20 21 22 23 24 25 26 27 28 29 30 31 32 33 34 35 36 37 38 39 40 41 42 43 44 45 46 47 48 49 50 51 52 53 54 55 56 57 58 59 60 61 62 63 64 65 66 67 68 69 70 71 72 73 74 75 76 77 78 79 80 81 82 83 84 85 86 87 88 89 90 91 92 93 94 95 96 97 98 99 100 101 102 103 104 105 106 107 108 109 110 111 112 113 114 115 116 |
#!/usr/bin/env python # -*- coding: utf-8 -*- import requests import json import os import commands import time import RPi.GPIO as GPIO GOOGLE_APIKEY = 'APIキー入力' LISTEN_SECONDS = 3 #3秒 録音 VOICE_IN_PATH = '/home/pi/tmp.flac' #GPIO設定 GPIO.setmode(GPIO.BCM) GPIO.setup(2, GPIO.OUT) GPIO.setup(3, GPIO.OUT) GPIO.setup(4, GPIO.OUT) GPIO.output(2, 0) GPIO.output(3, 0) GPIO.output(4, 0) # 音声入力 (音声→音声データ) def listen(seconds): print 'lestening...' cmdline = 'AUDIODEV=hw:1 rec -c 1 -r 17000 ' + VOICE_IN_PATH + \ ' trim 0 ' + str(seconds) os.system(cmdline) return os.path.getsize(VOICE_IN_PATH) # 音声認識 (音声データ→テキスト) def recognize(): print('recognizing...') f = open(VOICE_IN_PATH, 'rb') voice = f.read() f.close() # 英語 lang=en-US url = 'https://www.google.com/speech-api/v2/recognize?xjerr=1&client=chromium&'\ 'lang=en-US&maxresults=10&pfilter=0&xjerr=1&key=' + GOOGLE_APIKEY hds = {'Content-type': 'audio/x-flac; rate=17000'} try: reply = requests.post(url, data=voice, headers=hds).text except IOError: return '#CONN_ERR' except: return '#ERROR' objs = reply.split(os.linesep) for obj in objs: if not obj: continue alternatives = json.loads(obj)['result'] if len(alternatives) == 0: continue return alternatives[0]['alternative'][0]['transcript'] return "" def current_milli_time(): return int(round(time.time() * 1000)) if __name__ == '__main__': #first time record will be failed. listen(1) no_word = 0 wifi_err = 0 try: while True: # 音声入力 t0 = current_milli_time() GPIO.output(2, 1) #Rec LED点灯 size = listen(LISTEN_SECONDS) GPIO.output(2, 0) #Rec LED消灯 t = current_milli_time() - t0 if (t < 2000): print 'USB microphone not available' time.sleep(10) continue print 'listened:' + str(t) + 'ms' print 'voice data size=' + str(size) # 音声認識 t0 = current_milli_time() message = recognize().encode('utf-8') print 'recognized:' + str(current_milli_time() - t0) + 'ms' if (message == '#CONN_ERR'): print 'internet not available' time.sleep(10) continue elif (message == '#ERROR'): print 'voice recognize failed' time.sleep(10) continue print 'Result: ' + message #L R 判別動作 if 'right' in message: print 'right' GPIO.output(3, 1) # サーボ右 GPIO.output(4, 0) #LEDライト消灯 time.sleep(3) elif 'light' in message: print 'light' GPIO.output(3, 0) # サーボ上 GPIO.output(4, 1) #LEDライト点灯 time.sleep(3) else: print 'non' except KeyboardInterrupt: GPIO.cleanup() pass |
Arduino IDEプログラム
NeoPixel用のライブラリは以下にあります。
https://github.com/adafruit/Adafruit_NeoPixel
ラズパイからの信号を受けてサーボとNeoPixelリングを制御します。
|
1 2 3 4 5 6 7 8 9 10 11 12 13 14 15 16 17 18 19 20 21 22 23 24 25 26 27 28 29 30 31 32 33 34 35 36 37 38 39 40 41 42 43 44 45 46 47 48 49 50 51 52 53 54 55 56 57 58 |
#include <Servo.h> #include <Adafruit_NeoPixel.h> int GPIO3 = 3; int GPIO4 = 4; int servo, LED; Servo myservo; Adafruit_NeoPixel strip = Adafruit_NeoPixel(12, 6, NEO_GRB + NEO_KHZ800); void setup() { Serial.begin(9600); // make the pushbutton's pin an input: pinMode(GPIO3, INPUT); pinMode(GPIO4, INPUT); myservo.attach(9); myservo.write(0); myservo.detach(); strip.begin(); strip.show(); // Initialize all pixels to 'off' } void loop() { //Read GPIO servo = digitalRead(GPIO3); LED = digitalRead(GPIO4); Serial.print(servo); Serial.print("\t"); Serial.println(LED); //サーボ myservo.attach(9); delay(100); if(servo == 1){ myservo.write(0); }else{ myservo.write(90); } myservo.detach(); delay(100); //LED int bright = 20; if(LED == 1){ for(uint16_t i=0; i<strip.numPixels(); i++) { strip.setPixelColor(i, strip.Color(bright, bright, bright)); } strip.show(); }else{ strip.clear(); strip.show(); } } |
動作
ラズパイちゃんがきちんとLとRの違いを聞き分けてくれているようです(たぶん。。。)
これで我が家は英語の教育をしていこうと思いますww
参考
Raspberry PiのGPIOを制御する (Python編)
追記
Arduino公式Twitterで紹介いただきました 😛
“I made a pronunciation training machine using the Google Speech API.” https://t.co/XmGAoDLa24 pic.twitter.com/gbzZfoGc6Z
— Arduino (@arduino) 2017年4月12日
Raspberry Pi公式サイトで紹介いただきました 😆
https://www.raspberrypi.org/blog/pronunciation-training-machine/
Adafruit公式サイトで紹介いただきました 😆
みんなのラズパイコンテスト2017で優良賞頂きました!!
今年は優良賞でした! #ラズパイ #みんなのラズパイコンテスト https://t.co/Ff3JhhhE8I pic.twitter.com/5B5XJgs7Eo
— HomeMadeGarbage (@H0meMadeGarbage) 2017年11月19日
日経トレンディネット
紹介いただきました!
 お父ちゃん
2017.4.16
