MakePython ESP32 Color LCD で 動画をWiFi受信 ー ScreenShotReceiver ー
本記事にはアフィリエイト広告が含まれます。
前回は Makerfabs 様よりいただいたMakePython ESP32 Color LCDの
ディスプレイにLovyanGFXライブラリをもちいてアニメーションを表示してみました。
せっかくESP32が搭載されておりますので、今回はWiFiでの動画の受信を試してみました。
目次
ScreenShotReceiver
ここではらびあんさんのScreenShotReceiverを使用してWiFiでの動画受信を試しました。
です…jpegデコーダかなり魔改造しました。
これも同じ仕組みでWiFiで受信しながらデコードして、最大32fps出ます。https://t.co/TK7FxWBn8w https://t.co/RAe56xXZwq— らびやん (@lovyan03) May 20, 2020
凄いですよね。これ。。。
ScreenShotReceiverとは
“PCの画面をJPEGにしてTCPで送信し、M5Stack/ESP32で受信して表示”するアプリケーションです。
以下でWindows用送信アプリと受信Arduinoサンプルコードがダウンロードできます。
https://github.com/lovyan03/ESP32_ScreenShotReceiver
受信Arduinoサンプルコード (ScreenShotReceiver)
以下のESP32向けのArduinoコードをダウンロードしてMakePython ESP32 Color LCDに書き込みます。
https://github.com/lovyan03/ESP32_ScreenShotReceiver/tree/master/ScreenShotReceiver
以下のライブラリも必要となりますので導入しておきます。
MakePython ESP32 Color LCDに搭載されたカラーLCD ST7789 (240 × 240)向けに設定します。
SPI設定にはTFT_eSPIが利用されていますので、TFT_eSPIライブラリのUser_Setup.h ファイルを編集します。
|
1 2 3 4 5 6 7 8 9 10 11 12 13 14 15 16 17 18 19 20 21 22 23 24 25 26 27 28 29 30 31 32 33 34 35 36 37 38 39 40 41 42 43 44 45 46 47 48 49 50 51 52 53 54 55 56 57 58 59 60 61 62 63 64 65 66 67 68 69 70 71 72 73 74 75 76 77 78 79 80 81 82 83 84 85 86 87 88 89 90 91 92 93 94 95 96 97 98 99 100 101 102 103 104 105 106 107 108 109 110 111 112 113 114 115 116 117 118 119 120 121 122 123 124 125 126 127 128 129 130 131 132 133 134 135 136 137 138 139 140 141 142 143 144 145 146 147 148 149 150 151 152 153 154 155 156 157 158 159 160 161 162 163 164 165 166 167 168 169 170 171 172 173 174 175 176 177 178 179 180 181 182 183 184 185 186 187 188 189 190 191 192 193 194 195 196 197 198 199 200 201 202 203 204 205 206 207 208 209 210 211 212 213 214 215 216 217 218 219 220 221 222 223 224 225 226 227 228 229 230 231 232 233 234 235 236 237 238 239 240 241 242 243 244 245 246 247 248 249 250 251 252 253 254 255 256 257 258 259 260 261 262 263 264 265 266 267 268 269 270 271 272 273 274 275 276 277 278 279 280 281 282 283 284 285 286 287 288 289 290 291 292 293 294 295 296 297 298 299 300 301 302 303 304 305 306 307 |
// USER DEFINED SETTINGS // Set driver type, fonts to be loaded, pins used and SPI control method etc // // See the User_Setup_Select.h file if you wish to be able to define multiple // setups and then easily select which setup file is used by the compiler. // // If this file is edited correctly then all the library example sketches should // run without the need to make any more changes for a particular hardware setup! // Note that some sketches are designed for a particular TFT pixel width/height // ################################################################################## // // Section 1. Call up the right driver file and any options for it // // ################################################################################## // Define STM32 to invoke optimised processor support (only for STM32) //#define STM32 // Defining the STM32 board allows the library to optimise the performance // for UNO compatible "MCUfriend" style shields //#define NUCLEO_64_TFT //#define NUCLEO_144_TFT // STM32 8 bit parallel only: // If STN32 Port A or B pins 0-7 are used for 8 bit parallel data bus bits 0-7 // then this will improve rendering performance by a factor of ~8x //#define STM_PORTA_DATA_BUS //#define STM_PORTA_DATA_BUS // Tell the library to use 8 bit parallel mode (otherwise SPI is assumed) //#define TFT_PARALLEL_8_BIT // Display type - only define if RPi display //#define RPI_DISPLAY_TYPE // 20MHz maximum SPI // Only define one driver, the other ones must be commented out //#define ILI9341_DRIVER //#define ST7735_DRIVER // Define additional parameters below for this display //#define ILI9163_DRIVER // Define additional parameters below for this display //#define S6D02A1_DRIVER //#define RPI_ILI9486_DRIVER // 20MHz maximum SPI //#define HX8357D_DRIVER //#define ILI9481_DRIVER //#define ILI9486_DRIVER //#define ILI9488_DRIVER // WARNING: Do not connect ILI9488 display SDO to MISO if other devices share the SPI bus (TFT SDO does NOT tristate when CS is high) #define ST7789_DRIVER // Full configuration option, define additional parameters below for this display //#define ST7789_2_DRIVER // Minimal configuration option, define additional parameters below for this display //#define R61581_DRIVER //#define RM68140_DRIVER //#define ST7796_DRIVER // Some displays support SPI reads via the MISO pin, other displays have a single // bi-directional SDA pin and the library will try to read this via the MOSI line. // To use the SDA line for reading data from the TFT uncomment the following line: // #define TFT_SDA_READ // This option is for ESP32 ONLY, tested with ST7789 display only // For ST7789 and ILI9341 ONLY, define the colour order IF the blue and red are swapped on your display // Try ONE option at a time to find the correct colour order for your display // #define TFT_RGB_ORDER TFT_RGB // Colour order Red-Green-Blue // #define TFT_RGB_ORDER TFT_BGR // Colour order Blue-Green-Red // For M5Stack ESP32 module with integrated ILI9341 display ONLY, remove // in line below // #define M5STACK // For ST7789, ST7735 and ILI9163 ONLY, define the pixel width and height in portrait orientation // #define TFT_WIDTH 80 // #define TFT_WIDTH 128 #define TFT_WIDTH 240 // ST7789 240 x 240 and 240 x 320 // #define TFT_HEIGHT 160 // #define TFT_HEIGHT 128 #define TFT_HEIGHT 240 // ST7789 240 x 240 // #define TFT_HEIGHT 320 // ST7789 240 x 320 // For ST7735 ONLY, define the type of display, originally this was based on the // colour of the tab on the screen protector film but this is not always true, so try // out the different options below if the screen does not display graphics correctly, // e.g. colours wrong, mirror images, or tray pixels at the edges. // Comment out ALL BUT ONE of these options for a ST7735 display driver, save this // this User_Setup file, then rebuild and upload the sketch to the board again: // #define ST7735_INITB // #define ST7735_GREENTAB // #define ST7735_GREENTAB2 // #define ST7735_GREENTAB3 // #define ST7735_GREENTAB128 // For 128 x 128 display // #define ST7735_GREENTAB160x80 // For 160 x 80 display (BGR, inverted, 26 offset) // #define ST7735_REDTAB // #define ST7735_BLACKTAB // #define ST7735_REDTAB160x80 // For 160 x 80 display with 24 pixel offset // If colours are inverted (white shows as black) then uncomment one of the next // 2 lines try both options, one of the options should correct the inversion. // #define TFT_INVERSION_ON // #define TFT_INVERSION_OFF // ################################################################################## // // Section 2. Define the pins that are used to interface with the display here // // ################################################################################## // If a backlight control signal is available then define the TFT_BL pin in Section 2 // below. The backlight will be turned ON when tft.begin() is called, but the library // needs to know if the LEDs are ON with the pin HIGH or LOW. If the LEDs are to be // driven with a PWM signal or turned OFF/ON then this must be handled by the user // sketch. e.g. with digitalWrite(TFT_BL, LOW); // #define TFT_BL 32 // LED back-light control pin // #define TFT_BACKLIGHT_ON HIGH // Level to turn ON back-light (HIGH or LOW) // We must use hardware SPI, a minimum of 3 GPIO pins is needed. // Typical setup for ESP8266 NodeMCU ESP-12 is : // // Display SDO/MISO to NodeMCU pin D6 (or leave disconnected if not reading TFT) // Display LED to NodeMCU pin VIN (or 5V, see below) // Display SCK to NodeMCU pin D5 // Display SDI/MOSI to NodeMCU pin D7 // Display DC (RS/AO)to NodeMCU pin D3 // Display RESET to NodeMCU pin D4 (or RST, see below) // Display CS to NodeMCU pin D8 (or GND, see below) // Display GND to NodeMCU pin GND (0V) // Display VCC to NodeMCU 5V or 3.3V // // The TFT RESET pin can be connected to the NodeMCU RST pin or 3.3V to free up a control pin // // The DC (Data Command) pin may be labeled AO or RS (Register Select) // // With some displays such as the ILI9341 the TFT CS pin can be connected to GND if no more // SPI devices (e.g. an SD Card) are connected, in this case comment out the #define TFT_CS // line below so it is NOT defined. Other displays such at the ST7735 require the TFT CS pin // to be toggled during setup, so in these cases the TFT_CS line must be defined and connected. // // The NodeMCU D0 pin can be used for RST // // // Note: only some versions of the NodeMCU provide the USB 5V on the VIN pin // If 5V is not available at a pin you can use 3.3V but backlight brightness // will be lower. // ###### EDIT THE PIN NUMBERS IN THE LINES FOLLOWING TO SUIT YOUR ESP8266 SETUP ###### // For NodeMCU - use pin numbers in the form PIN_Dx where Dx is the NodeMCU pin designation //#define TFT_CS PIN_D8 // Chip select control pin D8 //#define TFT_DC PIN_D3 // Data Command control pin //#define TFT_RST PIN_D4 // Reset pin (could connect to NodeMCU RST, see next line) //#define TFT_RST -1 // Set TFT_RST to -1 if the display RESET is connected to NodeMCU RST or 3.3V //#define TFT_BL PIN_D1 // LED back-light (only for ST7789 with backlight control pin) //#define TOUCH_CS PIN_D2 // Chip select pin (T_CS) of touch screen //#define TFT_WR PIN_D2 // Write strobe for modified Raspberry Pi TFT only // ###### FOR ESP8266 OVERLAP MODE EDIT THE PIN NUMBERS IN THE FOLLOWING LINES ###### // Overlap mode shares the ESP8266 FLASH SPI bus with the TFT so has a performance impact // but saves pins for other functions. It is best not to connect MISO as some displays // do not tristate that line wjen chip select is high! // On NodeMCU 1.0 SD0=MISO, SD1=MOSI, CLK=SCLK to connect to TFT in overlap mode // On NodeMCU V3 S0 =MISO, S1 =MOSI, S2 =SCLK // In ESP8266 overlap mode the following must be defined //#define TFT_SPI_OVERLAP // In ESP8266 overlap mode the TFT chip select MUST connect to pin D3 //#define TFT_CS PIN_D3 //#define TFT_DC PIN_D5 // Data Command control pin //#define TFT_RST PIN_D4 // Reset pin (could connect to NodeMCU RST, see next line) //#define TFT_RST -1 // Set TFT_RST to -1 if the display RESET is connected to NodeMCU RST or 3.3V // ###### EDIT THE PIN NUMBERS IN THE LINES FOLLOWING TO SUIT YOUR ESP32 SETUP ###### // For ESP32 Dev board (only tested with ILI9341 display) // The hardware SPI can be mapped to any pins #define TFT_MISO 12 #define TFT_MOSI 13 #define TFT_SCLK 14 #define TFT_CS 15 // Chip select control pin #define TFT_DC 22 // Data Command control pin #define TFT_RST 21 // Reset pin (could connect to RST pin) #define TFT_BL 5 //#define TFT_RST -1 // Set TFT_RST to -1 if display RESET is connected to ESP32 board RST //#define TOUCH_CS 21 // Chip select pin (T_CS) of touch screen //#define TFT_WR 22 // Write strobe for modified Raspberry Pi TFT only // For the M5Stack module use these #define lines //#define TFT_MISO 19 //#define TFT_MOSI 23 //#define TFT_SCLK 18 //#define TFT_CS 14 // Chip select control pin //#define TFT_DC 27 // Data Command control pin //#define TFT_RST 33 // Reset pin (could connect to Arduino RESET pin) //#define TFT_BL 32 // LED back-light (required for M5Stack) // ###### EDIT THE PINs BELOW TO SUIT YOUR ESP32 PARALLEL TFT SETUP ###### // The library supports 8 bit parallel TFTs with the ESP32, the pin // selection below is compatible with ESP32 boards in UNO format. // Wemos D32 boards need to be modified, see diagram in Tools folder. // Only ILI9481 and ILI9341 based displays have been tested! // Parallel bus is only supported for the STM32 and ESP32 // Example below is for ESP32 Parallel interface with UNO displays // Tell the library to use 8 bit parallel mode (otherwise SPI is assumed) //#define TFT_PARALLEL_8_BIT // The ESP32 and TFT the pins used for testing are: //#define TFT_CS 33 // Chip select control pin (library pulls permanently low //#define TFT_DC 15 // Data Command control pin - must use a pin in the range 0-31 //#define TFT_RST 32 // Reset pin, toggles on startup //#define TFT_WR 4 // Write strobe control pin - must use a pin in the range 0-31 //#define TFT_RD 2 // Read strobe control pin //#define TFT_D0 12 // Must use pins in the range 0-31 for the data bus //#define TFT_D1 13 // so a single register write sets/clears all bits. //#define TFT_D2 26 // Pins can be randomly assigned, this does not affect //#define TFT_D3 25 // TFT screen update performance. //#define TFT_D4 17 //#define TFT_D5 16 //#define TFT_D6 27 //#define TFT_D7 14 // ################################################################################## // // Section 3. Define the fonts that are to be used here // // ################################################################################## // Comment out the #defines below with // to stop that font being loaded // The ESP8366 and ESP32 have plenty of memory so commenting out fonts is not // normally necessary. If all fonts are loaded the extra FLASH space required is // about 17Kbytes. To save FLASH space only enable the fonts you need! #define LOAD_GLCD // Font 1. Original Adafruit 8 pixel font needs ~1820 bytes in FLASH #define LOAD_FONT2 // Font 2. Small 16 pixel high font, needs ~3534 bytes in FLASH, 96 characters #define LOAD_FONT4 // Font 4. Medium 26 pixel high font, needs ~5848 bytes in FLASH, 96 characters #define LOAD_FONT6 // Font 6. Large 48 pixel font, needs ~2666 bytes in FLASH, only characters 1234567890:-.apm #define LOAD_FONT7 // Font 7. 7 segment 48 pixel font, needs ~2438 bytes in FLASH, only characters 1234567890:-. #define LOAD_FONT8 // Font 8. Large 75 pixel font needs ~3256 bytes in FLASH, only characters 1234567890:-. //#define LOAD_FONT8N // Font 8. Alternative to Font 8 above, slightly narrower, so 3 digits fit a 160 pixel TFT #define LOAD_GFXFF // FreeFonts. Include access to the 48 Adafruit_GFX free fonts FF1 to FF48 and custom fonts // Comment out the #define below to stop the SPIFFS filing system and smooth font code being loaded // this will save ~20kbytes of FLASH #define SMOOTH_FONT // ################################################################################## // // Section 4. Other options // // ################################################################################## // Define the SPI clock frequency, this affects the graphics rendering speed. Too // fast and the TFT driver will not keep up and display corruption appears. // With an ILI9341 display 40MHz works OK, 80MHz sometimes fails // With a ST7735 display more than 27MHz may not work (spurious pixels and lines) // With an ILI9163 display 27 MHz works OK. // #define SPI_FREQUENCY 1000000 // #define SPI_FREQUENCY 5000000 // #define SPI_FREQUENCY 10000000 // #define SPI_FREQUENCY 20000000 #define SPI_FREQUENCY 27000000 // Actually sets it to 26.67MHz = 80/3 // #define SPI_FREQUENCY 40000000 // #define SPI_FREQUENCY 80000000 // Optional reduced SPI frequency for reading TFT #define SPI_READ_FREQUENCY 20000000 // The XPT2046 requires a lower SPI clock rate of 2.5MHz so we define that here: #define SPI_TOUCH_FREQUENCY 2500000 // The ESP32 has 2 free SPI ports i.e. VSPI and HSPI, the VSPI is the default. // If the VSPI port is in use and pins are not accessible (e.g. TTGO T-Beam) // then uncomment the following line: //#define USE_HSPI_PORT // Comment out the following #define if "SPI Transactions" do not need to be // supported. When commented out the code size will be smaller and sketches will // run slightly faster, so leave it commented out unless you need it! // Transaction support is needed to work with SD library but not needed with TFT_SdFat // Transaction support is required if other SPI devices are connected. // Transactions are automatically enabled by the library for an ESP32 (to use HAL mutex) // so changing it here has no effect // #define SUPPORT_TRANSACTIONS |
起動
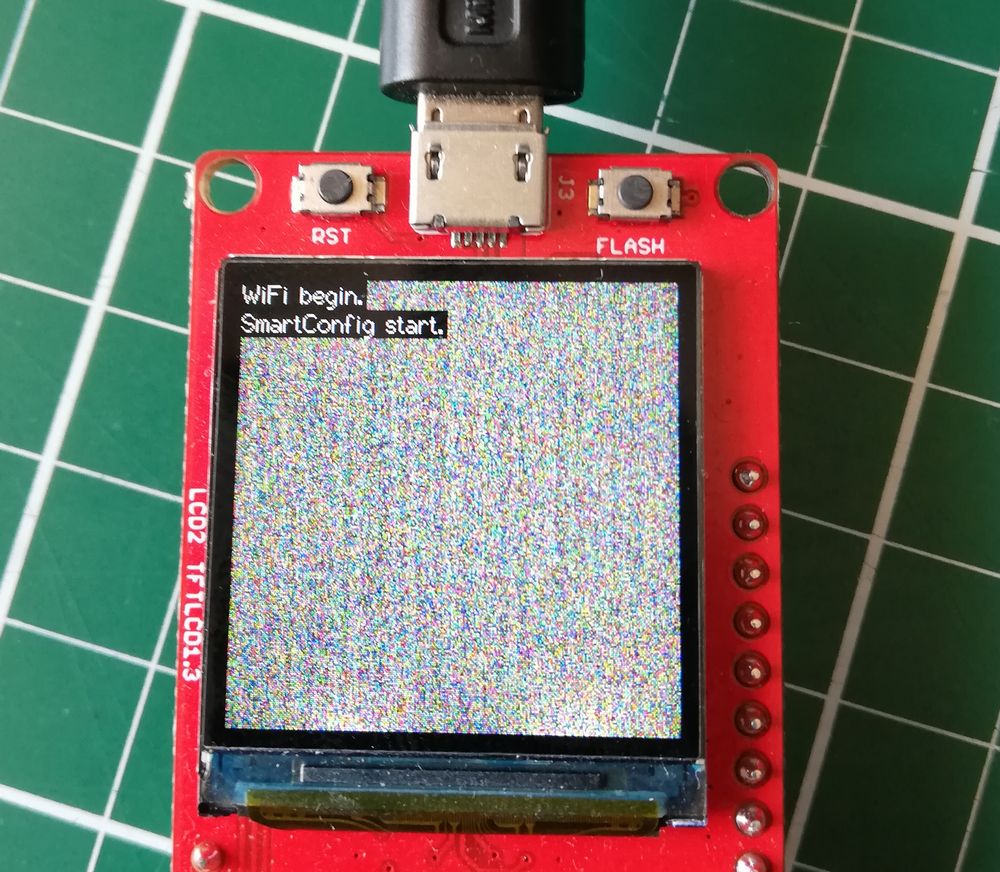
書き込みが完了し起動すると”WiFi接続を試行し、接続できない場合はSmartConfigが起動します。”
SmartConfig
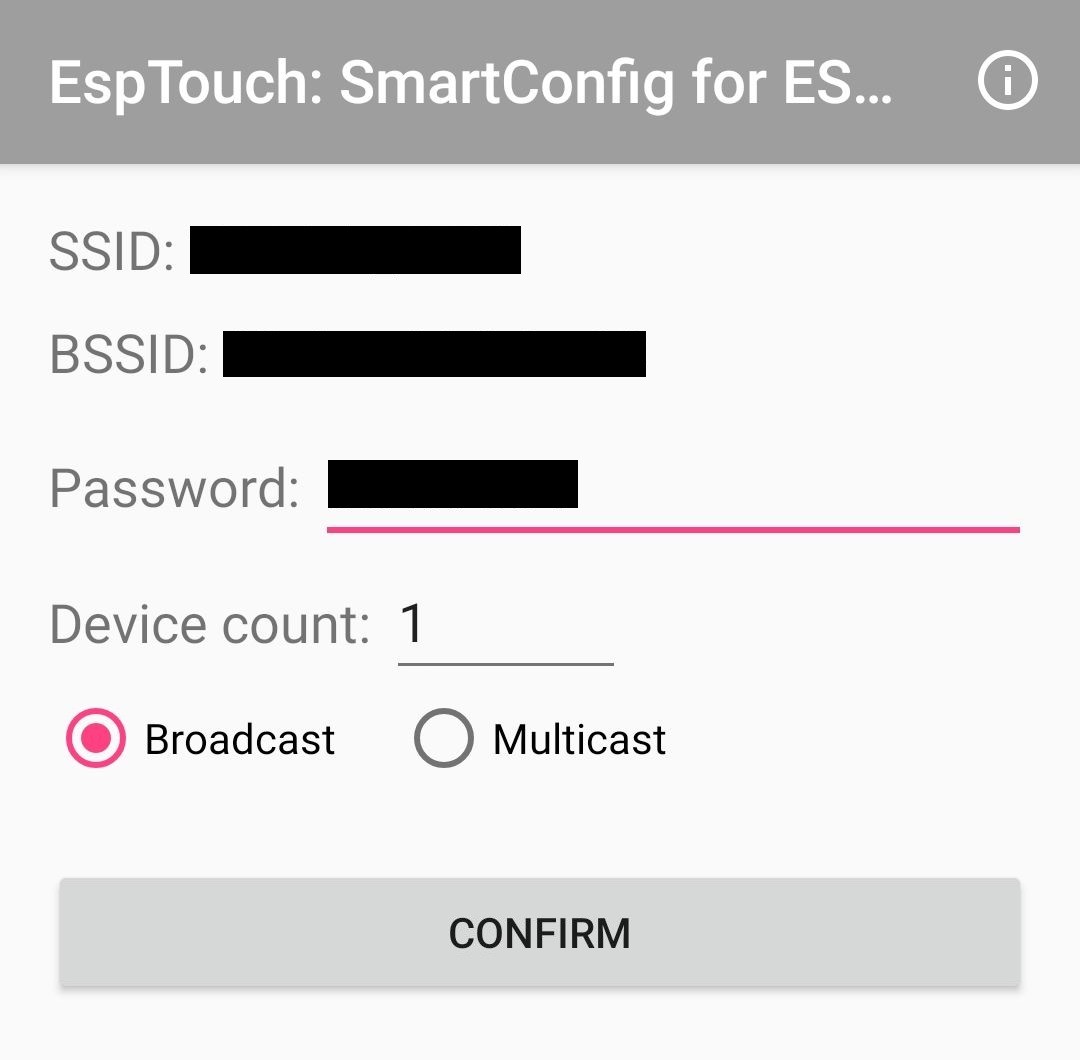
SmartConfigとはESP32をWiFiのアクセスポイントとして、スマホからWiFi設定を実行する機能です。
Android用スマホアプリは以下でインストールできます。
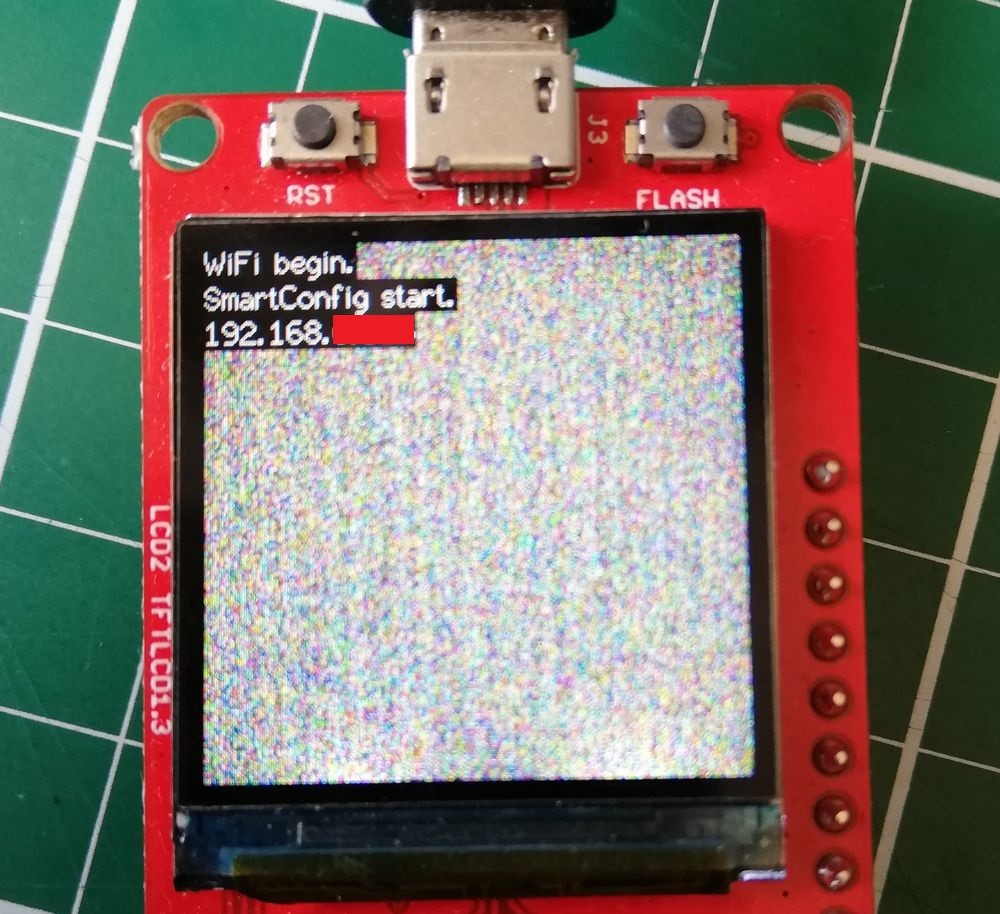
SmartConfigアプリでWiFi設定しESP32をWiFi接続します。
接続が完了するとディスプレイにIPアドレスが表示されます。
参考
Windows用 送信アプリ (ScreenShotSender)
送信アプリ ScreenShotSender.exe を起動します。
設定ウィンドウと送信範囲指定ウィンドウが立ち上がります。
“画像の幅・高さ・画質の各パラメータとJPEG化する範囲が設定できます
受信側のIPアドレスを入力して接続すると、Windowsの画面の一部がLCDに表示されます。”
動作
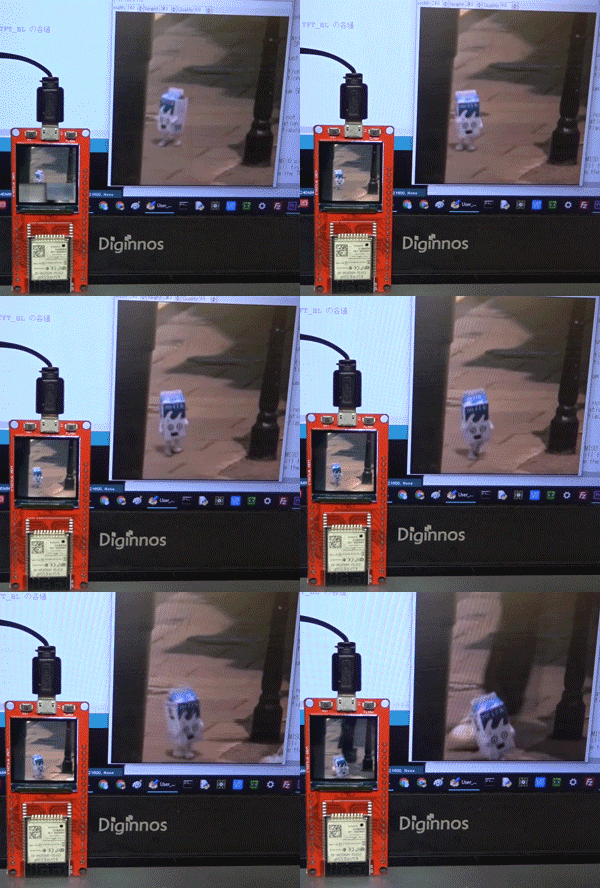
できました!
キレイにほぼ遅延なく表示されました! pic.twitter.com/pcZnjWVacu— HomeMadeGarbage (@H0meMadeGarbage) May 30, 2020
画質クオリティ60%でFSP 28ほどで送信できています。
凄い!これは非常に便利。
あとMakePython ESP32 Color LCD に搭載されているカラーLCD ST7789の画像がきれい!視野角も広いし。
速度改善
らびあんさんより速度改善方法を教えていただきました。
ちなみにコレを施すと SPI 80MHzでDMA転送が可能になります…。https://t.co/Mg8YIhgDF5
ESP-IDFの方では修正されてるんですが、ArduinoESP32はまだ古いままなので不具合でSPI 40MHz までしかDMA出来ないのです。
なおLovyanGFXはライブラリ使わずレジスタ制御してるので80MHz DMA可能になってます。— らびやん (@lovyan03) May 30, 2020
~\Arduino15\packages\esp32\hardware\esp32\1.0.4\tools\sdk\lib\libdriver.a
内のの5A 62 02 を B4 C4 04にバイナリエディタで変更でSPI 80MHzが可能になるとのことでした。
ですです。00 5A 62 02 が40MHzを表しているので、 00 B4 C4 04 の80MHzを表す値に書き換えればオッケーです。libdriver.aの中でこの並びが出てくるのは一か所だけのハズなので pic.twitter.com/4NL9K11xZc
— らびやん (@lovyan03) May 30, 2020
上記修正を施して、User_Setup.h ファイルで
#define SPI_FREQUENCY 27000000 → #define SPI_FREQUENCY 80000000
に変更して動作させてみました。
FPS 40以上で送受信できるようになりました!!
おわりに
らびあんさんの ScreenShotReceiver を使用させていただき、
MakePython ESP32 Color LCD で 動画をWiFi受信を楽しむことができました。
凄くサクサク受信・表示できて驚きました!
これはまたまたいろいろ応用ができそうで楽しみです 😛
追記
ESP32_ScreenShotReceiver 更新 (2020/6/30)
ScreenShotReceiver に更新があり、LCD SPI設定がTFT_eSPI依存であったのを
らびやんさんのグラフィックライブラリ LovyanGFXで設定できるようになりました。
詳細は以下の記事を参照ください。



I do not speak Japanese, But I would like to thank you for your great job you’ve done here, your project allowed me to create something that I had only in mind for years,
I promise to let you see it as soon as it’s done, but in the meantime thanks again for this amazing project!!